

18 Sep How to Create an Excel VSTO Add-in
Howdee! For many years now, being an Excel expert has been almost synonymous with being an expert in writing VBA code. While VBA is a wonderful tool, in 2017 it is a bit dated in my opinion. So, today I want to introduce a new topic, the Excel VSTO add-in. This might be new to some of you, some of you might know what it means, and some may have even experimented with it before. VSTO stands for Visual Studio Tools for Office and is a means to use Microsoft’s Visual Studio IDE (Integrated Development Environment) to create and build your own Excel (and other Microsoft Office applications) add-ins. This has actually been around for several years now, but has yet to be widely adopted. I think this is a mistake by the Excel community.
Why use Visual Studio Tools for Office?
Building your applications using VSTO makes sense for a few reasons. First, Visual Studio is a much more advanced development environment than the VBA editor. Intellisense is much more robust which allows for faster coding and easier debugging. The advanced environment can be intimidating when you’re used to the more simple VBA development interface (it definitely was for me), but it is surprisingly easy to pick up.
Second, you can code in Visual Basic, C#, Python, and even JavaScript (although the base language must be C# or Visual Basic). These languages have significantly more recent support, both by Microsoft and the community at large, than does VBA. Developers are constantly building more libraries that you can use and, with C# in particular, the more popular ones are rarely deprecated. Parsing JSON for example, there are a couple of libraries in VBA to do this, but the support for them is often slow or nonexistent. The Newtonsoft JSON library from NuGet, on the other hand, is incredibly robust (and supports serialization along with parsing) and is actively supported.
Third, the ability to make modern looking interfaces with Winforms and WPF (Windows Presentation Foundation) makes your Excel applications look significantly more attractive than using VBA. Referencing a bit of reason number two here, there are dozens of libraries that extend the functionality of user interfaces and make it easier and faster to build beautiful Excel add-ins. I’ve used a couple of different libraries both professionally and personally and these really make the process fast, easy, and intuitive.
Finally, VSTO offers the ability to extend your Excel applications to the web. You can do this a couple of different ways. You can use task panes to bring the web into your desktop Excel applications, or you can use javascript and create add-ins that run in Excel online. That means you can easily make your add-in cross-platform by utilizing Excel online!
Creating your first Excel VSTO Add-in
Today, I want to just cover the basics of building an Excel VSTO application and I’ll get into some more detailed implementations in later posts. To start you’ll need to download Visual Studio. Any version 2010 or later will work, but I’ll be working with the 2017 community edition (the free version). You can download this here if you need to.
In the install options, I would recommend at least the following three items to get started: Universal Windows Platform development, .Net Desktop development, & Office/Sharepoint development.

With these three you should have plenty to get started developing your Excel add-ins. Once Visual Studio installs and you open it, you’ll see a start screen with a lot of different links on it. This is just the default start screen and you can pick up previous projects from here in the future. To get started with a new project, select “File” in the top left and then “New” and, finally, “Project”.
In the window that opens, select the language you wish to use (I’ll be using C# today). As I mentioned earlier, you must choose either Visual Basic or C# to start your app with, but you can use other languages later if desired. Next, select the Office/SharePoint section. In the center window, you’ll see several options underneath this language for the project template. You can create Web Add-in’s that can be used in Microsoft Online, a VSTO Add-in, or a VSTO template/workbook. Today we will go over the Excel VSTO Add-in, so let’s select that. Don’t forget to name it something useful at the bottom of the window.

Once you click OK, the project will take a minute to build as Visual Studio will go ahead and start the project for you including the code you’ll need to initialize the add-in. This will be contained in the “ThisAddin” file. It contains two methods that handle the startup and shutdown of the add-in so anything you need to do during those times should go inside those methods.
For today’s example, let’s build a simple add-in that will simply read out the address of our current cell and the contents it contains. This will give you a good grasp of how to begin interacting with the Excel object model from a VSTO project. One question you might have asked yourself already, is how can the user control when the code runs? A common approach with VBA code is to assign a macro to a button or some other object within the workbook.
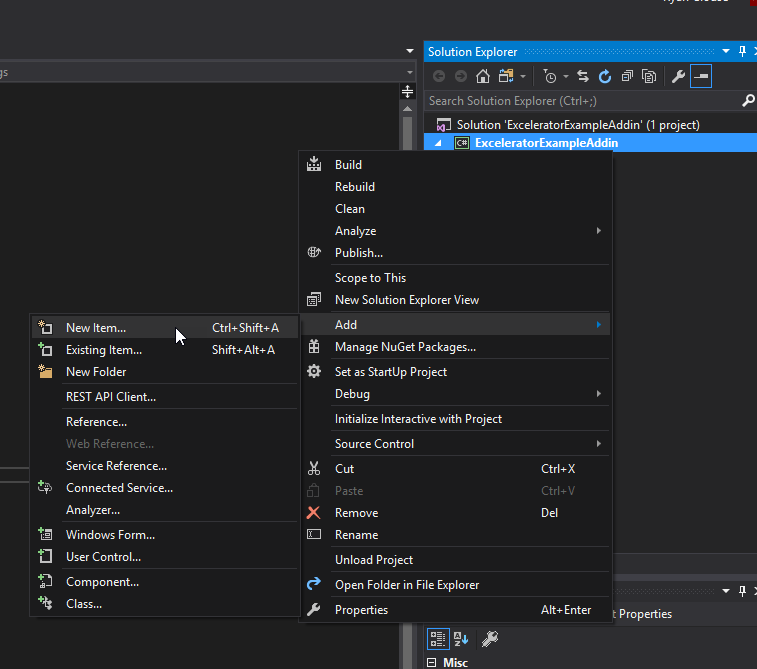
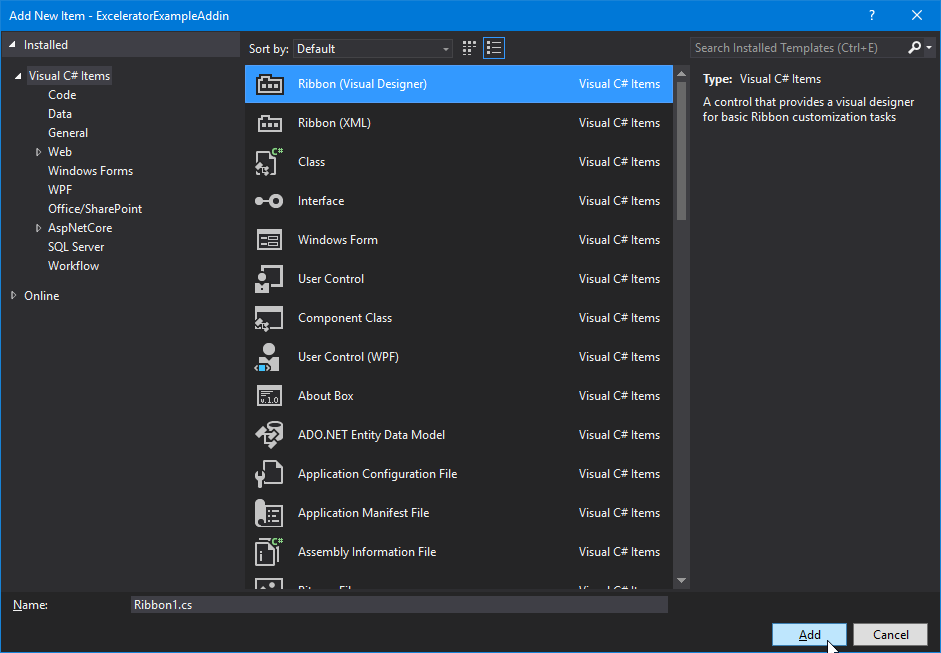
Since we can’t do that in this example, the easiest way to let a user control running the code is to tie it to a ribbon control. To do that, right-click on the project name in the solution explorer. Select “Add” and “New Item”. A new window will pop up. The default selection should be “Ribbon (Visual Designer)” and that just happens to be the one we need. You can rename this ribbon also if you desire and then click “Add” in the bottom right.
Visual Studio will install the Ribbon to the project and open the designer file. If the “Toolbox” is not open on the left side of your screen, open it now by clicking on “View” in the top left and selecting “Toolbox”. Alternatively, you could press Ctrl+alt+X on the keyboard to do this. If you’re clicked on the ribbon designer, you should see “Office Ribbon Controls” as the first option in the toolbox. Inside this group, there is an option for button. Click and drag the button the ribbon interface and it should snap to “group 1” as a new button with the label “button1”.
As with VBA, we can rename these so they display something a little more appropriate by using the “Properties” window. This should appear in the bottom right of your Visual Studio window. Click on the group or button and change the names to something that makes sense to you. Below is a screen grab with the elements we just talked about called out (click to enlarge):

Now, we have our button in place, let’s get to writing some code! From the ribbon designer, you can double click the button to create an event handler just like you would in a VBA user form. The first thing we need to do is create a reference to the active cell so we can return some data about it. To do this, I’m actually going to jump over to the “ThisAddIn” file and enter some code there to demonstrate how to reference code between files in Visual Studio. Switch to the file and add the following code in the ThisAddIn class (if you’re using C#):
[cc lang=”csharp”]
public Excel.Range GetActiveCell()
{
return (Excel.Range)Application.ActiveCell;
}
[/cc]
Next, back in the method we created by double-clicking our button in the Ribbon class, let’s add the following code:
[cc lang=”csharp”]
private void ReadCellDataBtn_Click(object sender, RibbonControlEventArgs e)
{
Range thisCell = Globals.ThisAddIn.GetActiveCell();
MessageBox
.Show(“This cell’s address is: ” + thisCell.Address + ” — And it’s value is: ” + thisCell.Value);
}
[/cc]
If you just enter the code as I displayed above, you’ll get errors. You’ll need to make sure you add the proper using statements to the top of the Ribbon1 class. Those are using Microsoft.Office.Interop.Excel; and using System.Windows;
Once this is done – we can test the Excel VSTO add-in by pressing F5 on our keyboard or clicking “Start” at the top of Visual Studio. This will open an instance of Excel for us to test with. We can type some information into a blank spreadsheet and quickly test if our code works. Please note that you’ll need to add the “Add-ins” ribbon to Excel if you haven’t done so already. This is done by clicking “File”, then “Options”, and finally “Customize Ribbon”. As you can see below, this example is returning the value of our active cell to a message box.

This is all I wanted to cover in this article since, if you’re new to Excel VSTO Add-ins, your head might be hurting right now. Don’t worry, mine was as well when I first started playing with them. My best recommendation for becoming familiar with this approach is to pick a project you’ve done in VBA (the simpler the better) and try to replicate it as an Excel VSTO add-in. That was my first step and I had a lot of mistakes on the way. However, I think this should be the future of working with Microsoft Excel applications for reasons stated at the beginning of this article. Let me know your thoughts below in the comments.
Also, the example file will be available for download as usual if you’re a free member to my site. However, with this type of add-in I am going to zip the Visual Studio project file up and have it available for download. So, if you want to test it out you will need to download Visual Studio before you’re able to. Feel free to drop a question in the comments if you have an issue doing this.
Cheers,
R
No Comments